
How To Set Up A Canva Brand Kit Like A Real Designer
(Without Redoing Hex Codes and looking for your logo every time)
Canva is an incredible tool for everyday business owners who want to feel in control of their marketing and branding. But anyone who has ever tried to design a week’s worth of social posts knows the truth. If your logos, fonts, graphics, and imagery aren’t set up properly, the process becomes slow, frustrating, and way more time consuming than it needs to be. I’m here to help you fix that by showing you exactly how to use Canva’s Brand Kit to your advantage so your design workflow feels organized, consistent, and actually enjoyable.

Photo Credit: Ahmed
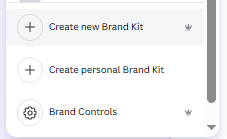
What A Canva Brand Kit Actually Is (And Why It Matters)
Think of your Canva brand kit as your brand’s control center, the place where all your visual identity pieces live together like a well organized closet that makes getting dressed feel easy.
Your brand kit holds:
Logos
Color palettes
Typography
Imagery and graphics
Brand voice guidelines
And it quietly does three very important jobs for you:
Standardization
Everything uses the same colors, fonts, and logo treatments so your brand feels cohesive instead of random.
Efficiency
You stop hunting for files, color codes, or that one logo you swear you saved somewhere.
Governance
Your team can create on brand content without accidentally breaking your aesthetic.
Once this is set up, Canva becomes a structured, supportive design tool that behaves like it knows you.
Your First Steps To Setting Up A Canva Brand Kit
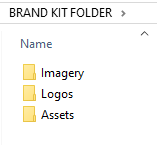
1. Gather Your Core Brand Assets
Before you open Canva, pull everything into one tidy folder so you’re not playing hide and seek with your logos.
You need:
Logos
HEX color codes
Brand fonts
A handful of anchor images
Voice and tone notes if you want Canva AI to stay on brand
This step alone saves hours.
2. Clean Your Logo Files
Upload your primary logo first, then add your stacked, icon, and reversed white versions so Canva always knows which one you want at your fingertips.
Make sure your logos are:
PNG or SVG
High resolution
Clearly named
Sized correctly for universal use
What is a good universal logo size? A solid, all purpose logo size for Canva is at least 2000 pixels on the longest side. This keeps your logo crisp in:
Social graphics
Presentations
Flyers
Website mockups
Print materials
Anything smaller can look soft or pixelated when scaled up. Anything larger is totally fine because Canva handles big files well.
If you’re exporting from Illustrator or Figma, aim for:
2000 x 2000 px for square logos
2400 x 1200 px for horizontal logos
1600 x 2400 px for vertical logos
These sizes give you flexibility without losing quality.
Logo variants: Primary horizontal, Stacked or vertical, Icon or monogram, Reversed white version.
Designer tip: Export logos from Illustrator or Figma. Screenshots make your logo look fuzzy and nothing kills brand confidence faster.
3. Confirm Your Brand Color HEX Codes
Grab your HEX codes from your brand guide, your website, or a color picker tool. These become your official palette inside Canva.
What HEX codes are HEX codes are six digit color codes that tell Canva the exact shade you want. They look like #F5B238 or #422E69 and act like a precise GPS coordinate for your brand colors.
Instead of guessing which pink or blue is “close enough,” HEX codes make sure your colors stay perfectly consistent across every design, every platform, every time.
They’re part of your brand’s identity just like your logo or fonts.
How to find HEX codes in Canva
Upload your logo or any brand image into Canva
Click on the image
Look for the Colors panel under “Photo Colors”
Canva automatically detects the colors in your image
Click any detected color
The HEX code appears in the color box
Copy that HEX code and save it in your brand kit
You can also:
Click the color picker tool inside Canva
Hover over any color in your design
Canva will show you the exact HEX code instantly
This is perfect when you’re trying to match your website, your logo, or any existing brand material.
Designer tip: Use a contrast checker. Accessibility is attractive.
4. Decide Your Font Hierarchy
Choose your:
Heading font
Subheading font
Body font
Insider tip: your heading fonts affect your SEO rank
This sounds wild, but it’s true. Search engines don’t “see” your fonts the way humans do, but they absolutely care about how your headings behave.
A clean, readable heading font helps your SEO because:
Search engines scan your headings first to understand what your content is about
Readable fonts make your H1, H2, and H3 easier for Google to interpret, which strengthens your keyword signals
Consistent font hierarchy helps search engines map your content structure, which improves crawlability
Clear headings keep readers on the page longer, and longer engagement boosts SEO performance
So when you choose your heading font, you’re not just picking something pretty. You’re choosing how clearly your content communicates with both humans and search engines.
What this means for your Canva brand kit
Your heading font should be:
Easy to read
Strong enough to stand out
Consistent across all designs
Clean at small and large sizes
Not overly decorative or hard to scan
Think of your heading font as your brand’s voice in bold. It guides your reader, supports your SEO, and keeps your content feeling polished and intentional.
5. Choose Your Imagery Style
Pick 5 to 10 images that represent your brand’s vibe. Think lighting, color tone, composition, personality. Upload these into your Brand Kit so your designs stay visually consistent.
Your imagery style is not just “pretty pictures.” It’s psychology, emotional branding, and how your audience decides, in seconds, whether they trust you, like you, or want to stay on your website.
Choose a tight, intentional collection of visuals that define your brand’s look and feel. These become your “anchor images,” the ones Canva will surface first and the ones your audience will start to associate with your brand.
Hero images Hero images are your big, bold, front‑and‑center visuals. They’re the photos you’d place at the top of a website, the opening slide of a presentation, or the main graphic in a promo. They’re clean, high impact, wide, spacious, and beautifully composed. A hero image sets the tone before anyone reads a single word. It’s your brand’s first impression.
Lifestyle photos Lifestyle photos show your brand in action or in a real‑life setting. They feel natural, warm, and human. Think people using your product, behind the scenes moments, or everyday scenes that match your brand personality. Lifestyle photos help your audience imagine themselves inside your world. They make your brand feel lived‑in instead of staged.
SVG icons SVG icons are tiny graphic symbols that stay crisp at any size. They never get blurry, pixelated, or fuzzy, even when you scale them up or down. Clean line icons, simple illustrations, and tiny visual helpers that guide the eye all fall into this category. SVGs keep your designs sharp and professional, especially in presentations, social graphics, and infographics.
Short videos Short videos are quick, punchy clips that add movement and personality to your brand. Think looping product clips, branded intro animations, five second lifestyle moments, or simple motion graphics. Short videos make your content feel modern and dynamic. They’re perfect for social posts, reels, ads, and animated presentations.
Insider secret: A few strong visuals define your brand better than a giant folder of randomness. Curate with intention.
6. Write A Mini Brand Voice Snapshot
Creating your brand voice is optional, but honestly it is one of the most powerful things you can add to your Canva Brand Kit. It makes your writing feel consistent, recognizable, and aligned with your visual identity. It also teaches Canva’s AI how to write like you instead of sounding generic.
What a brand voice actually is
Your brand voice is the personality of your writing. It is the tone, rhythm, attitude, and emotional energy behind the words you use. It is how your brand sounds when it speaks.
Think of it like this: If your brand walked into a room and started talking, your brand voice is what people would hear.
A brand voice shapes:
How you write
How you sound
How people feel when they read your content
How consistent your messaging is across platforms
How recognizable your brand becomes over time
It is not about being perfect. It is about being intentional.
How to create your brand voice snapshot
A brand voice snapshot is a short, scannable cheat sheet that tells Canva (and your team) exactly how your brand communicates.
Here’s how to build one.
Add tone descriptors Warm, Confident, Human, Calm, Clear, Playful, Grounded. Tone descriptors help Canva understand the emotional vibe of your writing.
Add sample phrases “Let’s make this simple.” “Here’s the real talk.” “You’re not behind. You just need a system.” Sample phrases teach Canva the rhythm and style of your voice.
Add do and don’t language rules Do: Use warm, conversational language. Do: Write in long flowing sentences. Do: Keep everything skim friendly. Don’t: Use jargon. Don’t: Use stiff corporate language. Don’t: Overcomplicate simple ideas.
These rules help Canva avoid writing in a tone that doesn’t feel like you.
Why this matters inside Canva
When you save your brand voice in Canva:
Canva’s AI writes captions, headlines, and descriptions that match your personality
Your designs feel more cohesive because your visuals and words finally match
You save time because Canva already knows how you talk
Your brand becomes more recognizable and consistent across every platform
It is one of the easiest ways to elevate your content without doing more work.
Governance, Maintenance, and Continuous Improvement
Ownership and Permissions
Assign a brand kit owner. Limit editing permissions. Keep a simple change log so updates stay clear and intentional.
Iterative Refinement
Review your brand kit quarterly. Remove outdated assets, add new campaign elements, and adjust palettes or fonts as your brand evolves. Use analytics to refine your visuals and reinforce what performs best.
Quick Skimmable Checklist
Logos uploaded
Colors added
Fonts set
Voice documented
Imagery curated
Templates created
Permissions set
Quarterly review scheduled
What Changes For You After This
You now know how to set up a Canva brand kit from concept to execution. Your brand becomes consistent, professional, and easy to maintain. You stop guessing and start designing with intention.
Your Canva finally feels like it’s working with you, not against you.
Catch up on All My Blogging Related Blog Posts Here.
You’ll Also Love


Hello, world! I’m Lourin. I’m a Kansas City mama, creative, and website designer who loves helping small businesses and community leaders show up with clarity and confidence. Here on the blog you can read about my favorite things, like small business growth, simple website tips, community stories, and the behind‑the‑scenes of building a life and business I love. So glad you’re here!


Boost Your Squarespace SEO in 48 Hours with Google Search ConsoleQuick guide to connect Google Search Console to Squarespace so you can see your real search keywords fast. See real keyword data, track impressions and clicks, and understand how people find your site. This simple setup helps you improve your SEO fast and make smarter updates over time.